Also linked here is a previous article on holding the uke with more tricks!
IMPORTANT: Here's a previous article on holding the uke: Are you holding the ukulele wrong? Avoid these 5 mistakes
You will Learn More and Play More with Play Ukulele NOW.
Find out for yourself why teachers and students have depended on Play Ukulele NOW Methods and Songbooks since 2009
Find out for yourself why teachers and students have depended on Play Ukulele NOW Methods and Songbooks since 2009
DISCLOSURE: THIS POST MAY CONTAIN AFFILIATE LINKS, MEANING I GET A COMMISSION IF YOU DECIDE TO MAKE A PURCHASE THROUGH MY LINKS, AT NO COST TO YOU. PLEASE READ MY DISCLOSURE FOR MORE INFO.
IMPORTANT: Here's a previous article on holding the uke: Are you holding the ukulele wrong? Avoid these 5 mistakes
Check that out first...
Here are some additional tricks you might like to use to help you to hold the ukulele...
GRAB YOUR 'HOLDING THE UKE' PDF HERE Includes pictures and instructions from my previous article and this article). You'll get 8 tricks to hold the uke with these...
#1.
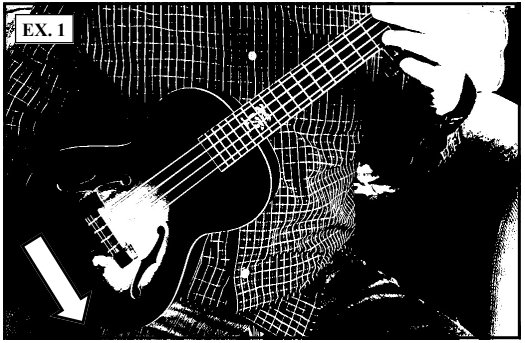
If you have a Tenor uke you can rest it on your leg like so (EX 1):
You don't want to sit with poor posture - you could hurt your back - and with smaller uke's you may look like hunchback trying to hold them in this way.
With a tenor uke (tenor uke is pictured) - you will likely be able to sit with your back straight - (proper posture) and let the instrument rest on your knee as shown.
For smaller uses you may have to hold them as I indicate here - if you've read that article (you should before reading this one) you'll agree that it's a balancing act to hold a uke in that way and this is one of the reasons I recommend tenor ukes for beginners.
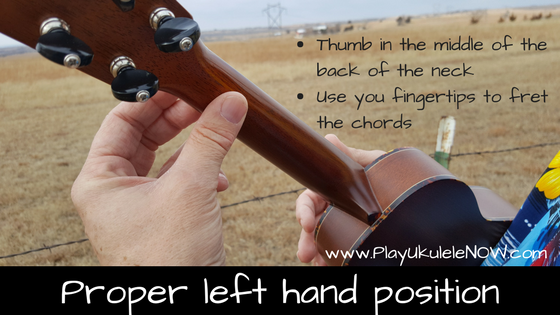
You want to make sure you have proper left hand position - thumb in the middle of the back of the neck and using your finger tips to fret notes - that's the most important thing for a beginner to do... So if a beginner has a tenor uke and can rest it on their leg, proper left hand position is a breeze.
#2
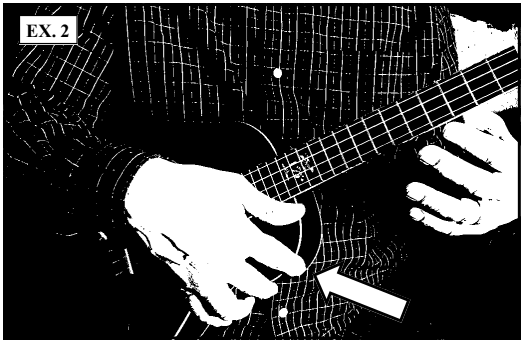
Hold the bottom of the uke with your first or first and second fingers while changing chords or moving up the neck (EX. 2):
This can be done while holding the uke as I indicate in my previous post as well, so this'll work for all sizes of ukes.
This works particularly well if you're strumming with your thumb because you can strum while holding the uke.
Basic thumb strums are a great choice for beginners.
You can switch to a few thumb strums if need be to hold the uke for a moment in this manner.
Notice the thumb remains in the middle of the back of the neck as the hand moves up - the left hand position.
For a beginner - the left hand fingers should always remain close to the strings, when moving or changing chords - you don't want 'flying fingers' where the fingers fly away from the fretboard between chords or fingerstyle passages.
#3
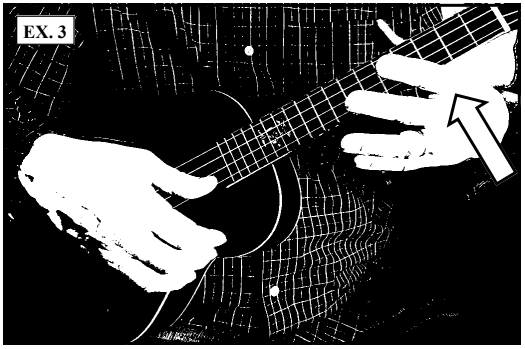
Let the uke rest on your first finger like so to hold the neck as you move up to higher positions (EX. 3):
If you need to change positions you may notice it's convenient to let the uke rest on your first finger (holding the uke in place as you move up).
After you slide up - assume proper left and position again...
Notice the space between then neck and your hand - only the thumb and the fingertips touch the instrument.
Drop a comment to let me know how these tricks work out for you and don't forget to GRAB YOUR 'HOLDING THE UKE' PDF HERE (Includes pictures and instructions from my previous article and this article). You'll get 8 tricks to hold the uke with these...
The PDF is from the pages of my "A Ukulele for Christmas: Fingerstyle Solos" book.
Could I just use a strap??
Sure!
Certainly you can just get a strap too - then you don't have to worry about any of this.
Here is a nice - no drilling needed strap.
It is the one I recommend because the part that clips on to the uke is very soft - and it's great quality - there are cheaper ones but with those the part that clips on to the uke is hard plastic...
learn more about it here:
I have performed without a strap but lately I use this strap to perform - since I play jazz chord melody when I perform it is helpful to have a strap...
Conclusion
When holding the uke remember (becasue you may not want to do all of the things I recommend and may leave some out) that proper left hand position is the most important thing - especially for a beginner. Thumb in the middle of the back of the neck (or slightly above the middle) - and use your fingertips to fret the notes (unless you're playing a barre or partial barre chord).
And always important - relax - hands and arms should not be tense...
If you chose to use a strap then proper left hand position will be a breeze.
MORE...
Learn more about how to simplify chords here with my book "Ukulele Chord Tricks: Simplify Any Chord"
To learn how to create beautiful chord progressions in any key - get my "Secrets of the Chord Chain" books.
FREE PDF's - Chord book and all scales harmonized with chords (with related articles):
Drop a comment to let me know what you think or how you're doing with these tricks.


No comments:
Post a Comment